All Resources

Camera Obscura

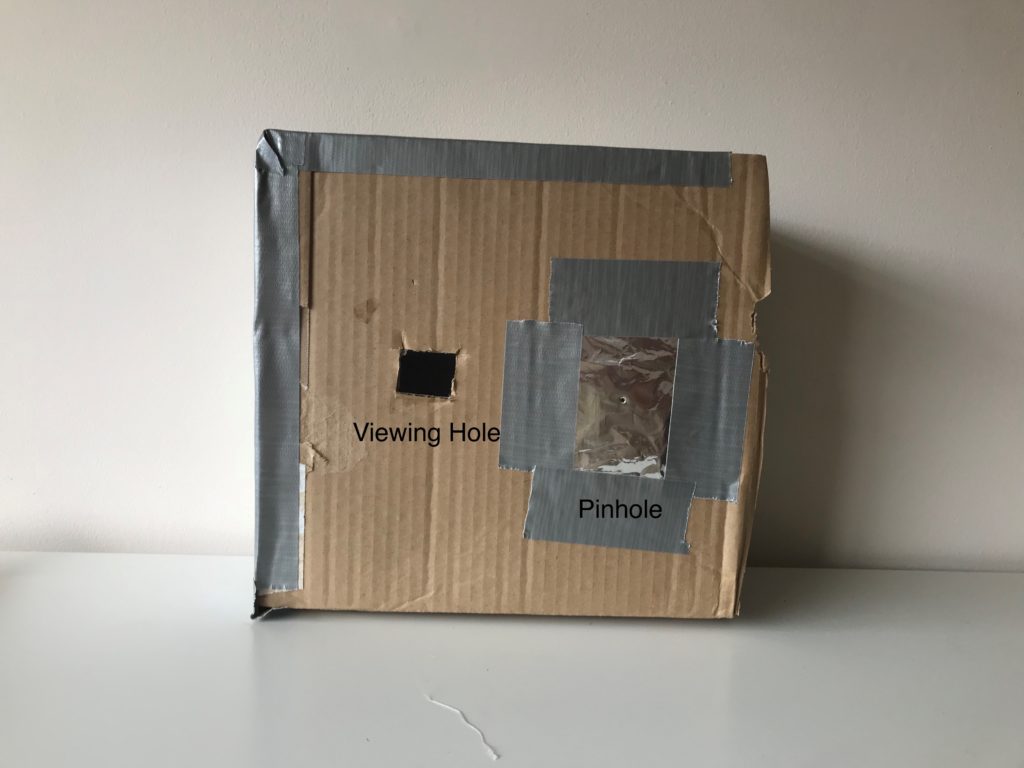
In this activity, we will make a basic camera obscura out of a cardboard box.

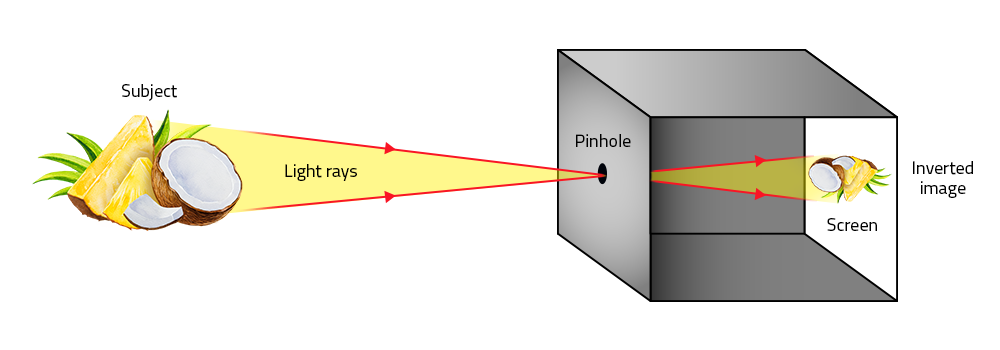
A camera obscura, or a pinhole camera, is a simple device that is often thought of as a precursor to the modern camera.

The camera obscura, Latin for “dark chamber”, consists of a dark chamber or box with a small hole in one of the four walls (or the ceiling). The light passing through the small hole will project an image of a scene outside the box onto the surface opposite to the hole. Since light moves in a straight line through the hole, the projected image will appear to be flipped upside-down and inverted.

Camera Obscura technology has been around since ancient times, with observations dating back to the fourth century BCE by a Chinese philosopher named Mozi. The camera obscura was studied throughout the years, and was used as a way to safely observe a solar eclipse in the 13th century. While early versions of the technology involved projecting into large rooms or tents, camera obscuras were eventually modified to fit into small boxes. Sometimes, a lens is added to focus the image, or mirrors are used to flip the image right-side-up before it is projected onto a screen.

Objectives

  • Describe how light travels to create a projected image.

Materials

  • Per Camera Obscura:
    medium-sized cardboard box e.g. shoe box (the box has to be able to close completely, creating a dark chamber)
    aluminum foil
    pin
    white paper
    tape (dark-coloured duct tape and scotch tape)

Key Questions

  • How does light travel to create the images you see?
  • How could you use different tools to observe the world around us?

What To Do

  1. Cut a piece of white paper to the size of one of the inside walls of the box. Tape it flat onto the inside wall. This will be the screen that your image is projected on.
  2. On the opposite wall to your screen cut away a small square (3cm) of the cardboard. This cut should be about 1/3 from the side (not in the middle).
  3. On the same wall as your foil cut away another small square (3cm) of cardboard. This cut should be about 1/3 away from the other side). This will your viewing hole. Tape a piece piece of foil over this square, so that it becomes a flap you can lift.
  4. Tape a piece of foil over the first square. You want to make sure that the foil is nice and flat, as any wrinkles will create a distortion in your image.
  5. Using a pin, poke a small hole in the foil. A very small hole with smooth sides will give good results.
  6. Seal up the box. Close the lid and tape it shut. At this point, light should only be able to enter the box through the pinhole and your viewing hole.
  7. To view the projection, stand with your back to a light source and peer into the box through your viewing hole. You should be able to see the outside environment (behind you) projected onto your screen!

pinhole camera

Hint: The brighter the environment outside your box, the easier it will be to see! Try pointing your pinhole out the window!

Extensions

  • Can you change something about your camera to change the image that you see?
  • Using lenses and mirrors, can you modify your camera so the image appears upright?
  • Try changing the size/shape of the pinhole. How does this affect your image?
  • Early camera obscuras were made using entire rooms. Can you think of ways to set up a camera obscura out of a room in your home?

Other Resources

Science and Media Museum | Introduction to the Camera Obscura 
Photography History Facts | History of Camera Obscura – Who Invented Camera Obscura? 
National Geographic | Pinhole Camera 

About the sticker

Survivors

Artist: Jeff Kulak

Jeff is a senior graphic designer at Science World. His illustration work has been published in the Walrus, The National Post, Reader’s Digest and Chickadee Magazine. He loves to make music, ride bikes, and spend time in the forest.

About the sticker

Egg BB

Artist: Jeff Kulak

Jeff is a senior graphic designer at Science World. His illustration work has been published in the Walrus, The National Post, Reader’s Digest and Chickadee Magazine. He loves to make music, ride bikes, and spend time in the forest.

About the sticker

Comet Crisp

Artist: Jeff Kulak

Jeff is a senior graphic designer at Science World. His illustration work has been published in the Walrus, The National Post, Reader’s Digest and Chickadee Magazine. He loves to make music, ride bikes, and spend time in the forest.

About the sticker

T-Rex and Baby

Artist: Michelle Yong

Michelle is a designer with a focus on creating joyful digital experiences! She enjoys exploring the potential forms that an idea can express itself in and helping then take shape.

About the sticker

Buddy the T-Rex

Artist: Michelle Yong

Michelle is a designer with a focus on creating joyful digital experiences! She enjoys exploring the potential forms that an idea can express itself in and helping then take shape.

About the sticker

Geodessy

Artist: Michelle Yong

Michelle is a designer with a focus on creating joyful digital experiences! She enjoys exploring the potential forms that an idea can express itself in and helping then take shape.

About the sticker

Science Buddies

Artist: Ty Dale

From Canada, Ty was born in Vancouver, British Columbia in 1993. From his chaotic workspace he draws in several different illustrative styles with thick outlines, bold colours and quirky-child like drawings. Ty distils the world around him into its basic geometry, prompting us to look at the mundane in a different way.

About the sticker

Western Dinosaur

Artist: Ty Dale

From Canada, Ty was born in Vancouver, British Columbia in 1993. From his chaotic workspace he draws in several different illustrative styles with thick outlines, bold colours and quirky-child like drawings. Ty distils the world around him into its basic geometry, prompting us to look at the mundane in a different way.

About the sticker

Time-Travel T-Rex

Artist: Ty Dale

From Canada, Ty was born in Vancouver, British Columbia in 1993. From his chaotic workspace he draws in several different illustrative styles with thick outlines, bold colours and quirky-child like drawings. Ty distils the world around him into its basic geometry, prompting us to look at the mundane in a different way.