All Resources

Black Light Investigations

In this investigation, students learn about wavelengths of light with a slinky demo and then get a chance to explore what things we can see (and not see) with black light!

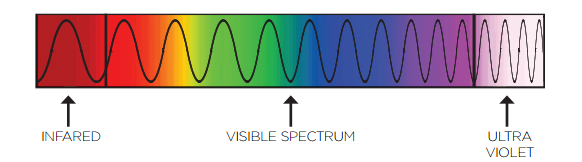
The human eye can see the visible spectrum: violet through red. Different colours come from different wavelengths of light. Red light has a long wavelength, the distance from peak to peak is long. The peaks and valleys of orange and yellow wavelengths are closer together. In green and blue those peaks and valleys are closer still. Indigo and violet have the shortest wavelength.

UV light has a shorter wavelength than blue light; shorter than 380 nm, and is invisible to the human eye. UV light makes certain objects glow because the objects contain "phosphors" which absorb the energy from UV light then release it again as visible light.

Objectives

  • Describe the wave-like nature of light and explain that only certain wavelengths are visible to the human eye.

Materials

  • Per Demo:
    rope or slinky
    Black light (Rona, Home Depot, Canadian Tire, or Teacher Source)
    Items that glow (club soda or tonic water, laundry detergent, toothpaste, glow-in-the-dark nail polish, postage stamps, paper, paper money)

Key Questions

  • What colours of light have a shorter wavelength?
  • What colours of light have a longer wavelength?
  • Why is black light invisible to the human eye?
  • What kind of objects tend to glow under black light?
  • Why do some objects glow under black light?

What To Do

Part One

  1. Hold up the rope/slinky and ask for a volunteer.
  2. Explain that we can think of light as a wave, with peaks and valleys. Different colours of light have different numbers of peaks and valleys.
  3. Shake the rope/slinky up and down slowly. Say that red light has a long wavelength and doesn’t have many peaks and valleys.
  4. Shake the rope quickly. Say that violet light has a short wavelength and has lots of peaks and valleys.
  5. Shake the rope even more quickly. Say that ultraviolet light has an even shorter wavelength and that it’s invisible to us because the human eye can’t detect that wavelength.

Part two

  1. Set up a central table with the black light and some materials to test. A comparison test could include the following materials:
Will Glow Won’t Glow
Tonic water Soda water
Laundry detergent Flour
Recently washed white T-shirt Colourful T-shirt
Real $20 bills Monopoly money
White paper Coloured paper
Ripe bananas Green bananas
Fluorescent pen Regular pen
  1. Gather students around the table so that they can see all of the objects. Make predictions as to which materials will or won’t glow.
  2. Turn off the classroom lights and pull the blinds. Test each material by placing it beneath the black light. The fluorescent materials will visibly glow.
  3. Discuss why each of the test materials fluoresces and how this property could be useful in examining evidence from the scene of a crime.

Extensions

  • Try using florescent powder as fingerprinting powder. After dusting the fingerprints, either shine the black light directly onto the object or lift the prints using clear tape and paste the strips of tape onto black construction paper. Can students create a crime scene in which black-light evidence can help solve the crime?
  • See Black Light Basics Resource for more information of florescence.

About the sticker

Survivors

Artist: Jeff Kulak

Jeff is a senior graphic designer at Science World. His illustration work has been published in the Walrus, The National Post, Reader’s Digest and Chickadee Magazine. He loves to make music, ride bikes, and spend time in the forest.

About the sticker

Egg BB

Artist: Jeff Kulak

Jeff is a senior graphic designer at Science World. His illustration work has been published in the Walrus, The National Post, Reader’s Digest and Chickadee Magazine. He loves to make music, ride bikes, and spend time in the forest.

About the sticker

Comet Crisp

Artist: Jeff Kulak

Jeff is a senior graphic designer at Science World. His illustration work has been published in the Walrus, The National Post, Reader’s Digest and Chickadee Magazine. He loves to make music, ride bikes, and spend time in the forest.

About the sticker

T-Rex and Baby

Artist: Michelle Yong

Michelle is a designer with a focus on creating joyful digital experiences! She enjoys exploring the potential forms that an idea can express itself in and helping then take shape.

About the sticker

Buddy the T-Rex

Artist: Michelle Yong

Michelle is a designer with a focus on creating joyful digital experiences! She enjoys exploring the potential forms that an idea can express itself in and helping then take shape.

About the sticker

Geodessy

Artist: Michelle Yong

Michelle is a designer with a focus on creating joyful digital experiences! She enjoys exploring the potential forms that an idea can express itself in and helping then take shape.

About the sticker

Science Buddies

Artist: Ty Dale

From Canada, Ty was born in Vancouver, British Columbia in 1993. From his chaotic workspace he draws in several different illustrative styles with thick outlines, bold colours and quirky-child like drawings. Ty distils the world around him into its basic geometry, prompting us to look at the mundane in a different way.

About the sticker

Western Dinosaur

Artist: Ty Dale

From Canada, Ty was born in Vancouver, British Columbia in 1993. From his chaotic workspace he draws in several different illustrative styles with thick outlines, bold colours and quirky-child like drawings. Ty distils the world around him into its basic geometry, prompting us to look at the mundane in a different way.

About the sticker

Time-Travel T-Rex

Artist: Ty Dale

From Canada, Ty was born in Vancouver, British Columbia in 1993. From his chaotic workspace he draws in several different illustrative styles with thick outlines, bold colours and quirky-child like drawings. Ty distils the world around him into its basic geometry, prompting us to look at the mundane in a different way.