All Resources

Stomp Rocket Launchers

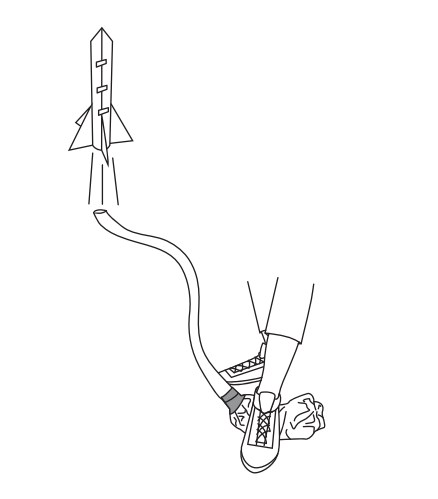
You don’t need fancy fuels to launch a rocket–this paper rocket toy can be launched using only a pop bottle and a garden hose.

Rockets are propelled by pressurized gas. When the gas escapes downwards, it pushes the rocket in the opposite direction, causing it to go up (Newton’s Third Law of Motion). This system of thrust is how a real rocket work,s whether it is in outer space, or here in the earth's atmosphere.

In this activity, stomp rockets are propelled by compressed air. 

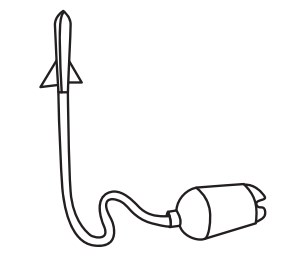
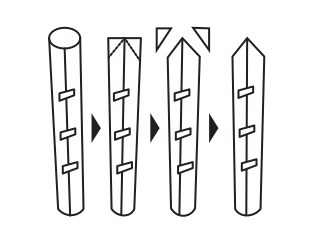
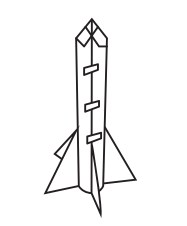
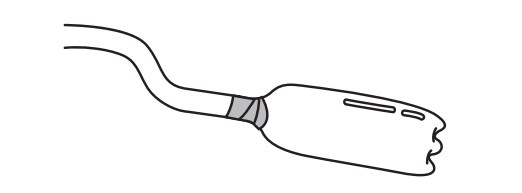
The paper rocket is placed on a launch tube connected to a plastic bottle. When you stomp on the plastic bottle, air rushes through the tube and fills the body of the rocket. The air pushes against the tube until the rocket pops off.

Objectives

  • Explore and demonstrate the effects of action and reaction forces.

  • Apply their understanding of forces and their effect on objects to manipulate the flight of toy rockets.

  • Use the scientific process (make predictions, conduct a fair test, control variables, gather and interpret data) to manipulate the flight distance of a toy rocket.

Materials

  • Per student:
    a garden hose, 12–17mm (1/2–3/4 inches) in diameter and 15–30cm long (or longer)
    1 to 2 pieces of cardstock
    scissors
    scotch tape
    a 2L pop bottle (no cap)
    duct tape

Key Questions

  • What causes the rocket to fly?
  • Can you make your rocket fly further?
  • Does the angle of the launch make any difference to the distance of the flight?

What To Do

Preparation
Pre-cut the garden hose to the appropriate length

Part 1: Building the Rocket

  1. Roll the cardstock around the outside of the garden hose and tape it with a piece of scotch tape. The tube (your rocket) should fit snugly onto the outside of the hose while still being able to slip off easily.
  2. Make the “nose” of the rocket. Cut the end of the tube into a point and use tape to create an air-tight seal. The rocket must be fairly air-tight to fly well.
  3. Create fins by attaching triangles of cardstock to the bottom of the rocket with scotch tape. You can experiment with the material, shape, size, placement and number of fins.

Part 2: Building the Launcher
Remove the cap from the pop bottle and duct tape the garden hose to its mouth. Make sure that this connection is airtight.

Part 3: Launching the Rocket! 

  1. Go outside and position your launcher and rocket so that it is safely pointed away from others.
  2. Place the rocket over the free end of the garden hose.
  3. Stomp on the pop bottle. The air from inside the bottle will be pushed through the tubing and into the rocket, sending it flying.
  4. To repeat, blow through the hose to re-inflate the pop bottle and re-launch the rocket!

Teacher Tip: A system for launching can prevent unwanted injuries by keeping everyone safely out of the way of flying projectiles!

Extensions

  • Does the number/shape/position of the fins make a difference?
  • Try shooting the rocket at a target to hit it.
  • Can you find the angle that will shoot the rocket the farthest?
  • Can you design a rocket that will shoot the farthest?

About the sticker

Survivors

Artist: Jeff Kulak

Jeff is a senior graphic designer at Science World. His illustration work has been published in the Walrus, The National Post, Reader’s Digest and Chickadee Magazine. He loves to make music, ride bikes, and spend time in the forest.

About the sticker

Egg BB

Artist: Jeff Kulak

Jeff is a senior graphic designer at Science World. His illustration work has been published in the Walrus, The National Post, Reader’s Digest and Chickadee Magazine. He loves to make music, ride bikes, and spend time in the forest.

About the sticker

Comet Crisp

Artist: Jeff Kulak

Jeff is a senior graphic designer at Science World. His illustration work has been published in the Walrus, The National Post, Reader’s Digest and Chickadee Magazine. He loves to make music, ride bikes, and spend time in the forest.

About the sticker

T-Rex and Baby

Artist: Michelle Yong

Michelle is a designer with a focus on creating joyful digital experiences! She enjoys exploring the potential forms that an idea can express itself in and helping then take shape.

About the sticker

Buddy the T-Rex

Artist: Michelle Yong

Michelle is a designer with a focus on creating joyful digital experiences! She enjoys exploring the potential forms that an idea can express itself in and helping then take shape.

About the sticker

Geodessy

Artist: Michelle Yong

Michelle is a designer with a focus on creating joyful digital experiences! She enjoys exploring the potential forms that an idea can express itself in and helping then take shape.

About the sticker

Science Buddies

Artist: Ty Dale

From Canada, Ty was born in Vancouver, British Columbia in 1993. From his chaotic workspace he draws in several different illustrative styles with thick outlines, bold colours and quirky-child like drawings. Ty distils the world around him into its basic geometry, prompting us to look at the mundane in a different way.

About the sticker

Western Dinosaur

Artist: Ty Dale

From Canada, Ty was born in Vancouver, British Columbia in 1993. From his chaotic workspace he draws in several different illustrative styles with thick outlines, bold colours and quirky-child like drawings. Ty distils the world around him into its basic geometry, prompting us to look at the mundane in a different way.

About the sticker

Time-Travel T-Rex

Artist: Ty Dale

From Canada, Ty was born in Vancouver, British Columbia in 1993. From his chaotic workspace he draws in several different illustrative styles with thick outlines, bold colours and quirky-child like drawings. Ty distils the world around him into its basic geometry, prompting us to look at the mundane in a different way.