All Resources

Magnificent Flying Machines

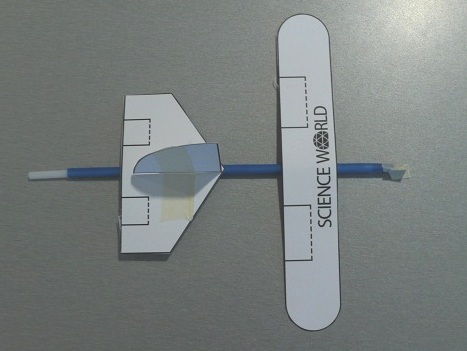
In this make and take, students determine how to manoeuvre their own glider by creating and adjusting custom aircraft controls. By adding flaps to the wings, fin, and rear stabilizer, they can attempt their own stunt moves!

As described in the previous activities, lift is created when air flows around the airfoil (wing). Faster air above the wing has lower pressure. The relative high pressure below the airfoil pushes up the wing, creating lift.


By changing the shape of the airfoil slightly, a pilot can adjust the amount of lift on each wing. On an airplane, there are three "flight controls": the ailerons (on the wings), which control the "roll"; the rudder, which controls the "yaw"; and the elevators (on the tail fins), which control the "pitch".
 

Ailerons: Roll control

The ailerons are situated on the trailing edge of the wing and can be angled upward or downward.

The movement controlled by the ailerons is called "roll". When the ailerons are in neutral position, the aircraft is level. If the aileron is folded slightly downward, the curvature of the airfoil is increased, increasing the lift. If the aileron points upward, the curvature of the airfoil is decreased, reducing the lift. The wing is pushed downward. When the pilot turns the control wheel (or stick) to the left, the left aileron goes up (decreases lift) and the right aileron goes down (increases lift), causing the plane to tilt to the left.

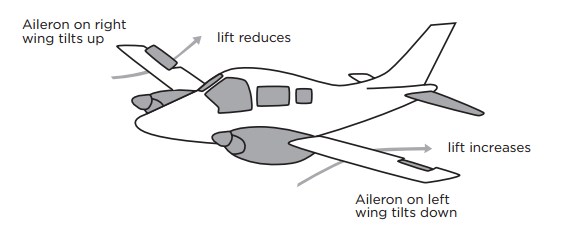
The left and right ailerons always move in opposite directions, meaning that one wing lifts and the other drops, turning the plane.
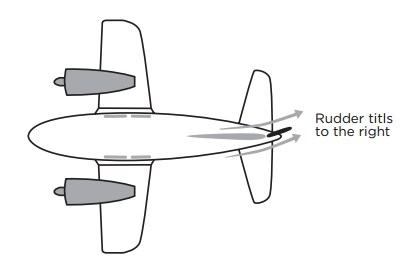
Rudder: Yaw control

The rudder is on the trailing edge of the vertical fin and can be angled right or left.

The movement controlled by the rudder is called "yaw." When the rudder is in neutral position, the aircraft flies straight. If the rudder shifts to the right, the air pushes more against the right side of the tail, swinging the tail to the left. The rudder is NOT used to turn the plane. It helps smooth out the turn created by the ailerons.

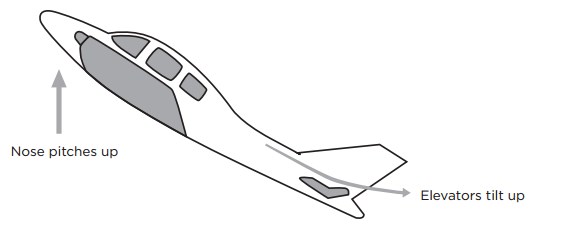
Elevators: Pitch control

The elevators are located on the trailing edge of the horizontal stabilizer, on each side of the fin.

The movement controlled by the elevators is called "pitch." When they are in neutral position, the plane is level. When the elevators tilt downward, the curve of the stabilizer is increased. This provides extra lift at the rear of the aircraft, causing the nose to point downward. When the elevators tilt upward, the curve of the stabilizer is decreased. This causes the rear of the aircraft to drop, lifting the nose.

Using any of these controls will increase the drag force on the aircraft, slowing it down slightly (they all restrict the air flow).

When testing a prototype of a design, trials are critical. Conducting trials several times (large sample size) will yield the most accurate results. In this exploration, students will perform 3 trials for each of the adjustments to their prototypes. This will allow them to determine with greater certainty the influence of each control on the flight path of their glider. The results of the entire class can be collated in order to provide a larger sample size.

Objectives

  • Determine how manipulating the design of aircraft changes the size and direction of flight forces and link those changes to changes in the aircraft’s motion.

Materials

Key Questions

  • Can you predict the direction of your glider by changing the position of the ailerons, the elevators, or the rudder?
  • Describe roll, pitch, and yaw in your own words.
  • Can you get your glider to roll 360 degrees?

What To Do

Part 1: Building the glider

  1. Staple one end of the fat straw several times
  2. Seal it with sticky tape to make it airtight
  3. Glue the paper template onto the cardboard and cut out the three pieces
  4. Tape the wings to the fat straw, 4 cm from its closed end.
  5. Tape the tail to the same straw 2 cm from the open end, then tape the rudder to the top of the tail.
  6. Decorate your glider (optional).
  7. To fly it, put the thin straw inside the fat straw. Put your head back and, holding onto the thin straw, blow into it.

Part 2: Controlling the pitch

  1. Slit and fold elevators (flaps on the tail).
  2. Predict what you think will happen to the flight path of your glider with the elevators angled up or down.
  3. Angle them both up.
  4. Observe and time its flight path.
  5. Repeat 3 times. Angle them both down.
  6. Observe and time its flight path.
  7. Repeat 3 times.

Part 3: Controlling the ailerons

  1. Slit and fold the ailerons (flaps on the wings)
  2. Predict what you think will happen to the flight path of your glider with the ailerons angled up or down.
  3. Angle one aileron up and one aileron down.
  4. Observe and time its flight path.
  5. Repeat 3 times.
  6. Reverse the positions of the ailerons.
  7. Observe and time its flight path.
  8. Repeat 3 times.

Part 4: Controlling the rudder

  1. Slit and fold the rudder (flap on the vertical fin).
  2. Predict what you think will happen to the flight path of your glider with the rudder angled to the left or to the right.
  3. Angle the rudder to the right.
  4. Observe and time its flight path.
  5. Repeat 3 times.
  6. Angle the rudder to the left.
  7. Observe and time its flight path.
  8. Repeat 3 times.

Part 5: Performing stunts

  1. Angle different controls at the same time and observe the flight path.
  2. Challenge yourself to perform various stunts.

Teacher Tips:
Make sure the two straws have a decent difference in diameter. Also, if you are using bendy straws, staple the bendy side, otherwise the plane will wobble.

Extensions

  • How will using these flight controls affect the force of drag on the glider?
  • Will the airplane fly faster or slower?
  • What will be the cost of using the flight controls too much?
  • Try different sizes of wings.
  • Use paperclip(s) to add weight to the wings, tail, or nose of the glider.

About the sticker

Survivors

Artist: Jeff Kulak

Jeff is a senior graphic designer at Science World. His illustration work has been published in the Walrus, The National Post, Reader’s Digest and Chickadee Magazine. He loves to make music, ride bikes, and spend time in the forest.

About the sticker

Egg BB

Artist: Jeff Kulak

Jeff is a senior graphic designer at Science World. His illustration work has been published in the Walrus, The National Post, Reader’s Digest and Chickadee Magazine. He loves to make music, ride bikes, and spend time in the forest.

About the sticker

Comet Crisp

Artist: Jeff Kulak

Jeff is a senior graphic designer at Science World. His illustration work has been published in the Walrus, The National Post, Reader’s Digest and Chickadee Magazine. He loves to make music, ride bikes, and spend time in the forest.

About the sticker

T-Rex and Baby

Artist: Michelle Yong

Michelle is a designer with a focus on creating joyful digital experiences! She enjoys exploring the potential forms that an idea can express itself in and helping then take shape.

About the sticker

Buddy the T-Rex

Artist: Michelle Yong

Michelle is a designer with a focus on creating joyful digital experiences! She enjoys exploring the potential forms that an idea can express itself in and helping then take shape.

About the sticker

Geodessy

Artist: Michelle Yong

Michelle is a designer with a focus on creating joyful digital experiences! She enjoys exploring the potential forms that an idea can express itself in and helping then take shape.

About the sticker

Science Buddies

Artist: Ty Dale

From Canada, Ty was born in Vancouver, British Columbia in 1993. From his chaotic workspace he draws in several different illustrative styles with thick outlines, bold colours and quirky-child like drawings. Ty distils the world around him into its basic geometry, prompting us to look at the mundane in a different way.

About the sticker

Western Dinosaur

Artist: Ty Dale

From Canada, Ty was born in Vancouver, British Columbia in 1993. From his chaotic workspace he draws in several different illustrative styles with thick outlines, bold colours and quirky-child like drawings. Ty distils the world around him into its basic geometry, prompting us to look at the mundane in a different way.

About the sticker

Time-Travel T-Rex

Artist: Ty Dale

From Canada, Ty was born in Vancouver, British Columbia in 1993. From his chaotic workspace he draws in several different illustrative styles with thick outlines, bold colours and quirky-child like drawings. Ty distils the world around him into its basic geometry, prompting us to look at the mundane in a different way.